Building a Garden Gate  by  Dave Mudge © 2002

I am going to build a gate and try to document all aspects of the project. Artist / Blacksmiths may have
a good time following the progress and may even pick up some useful information along the way.
I don't claim to be either "traditional" or "contemporary", I just do what I do and I do it to the best of my ability. Please read the
DISCLAIMER before you proceed. If you care to comment or discuss any aspect or issue of this project feel free to e-mail me here  put GATE  in the subject line.


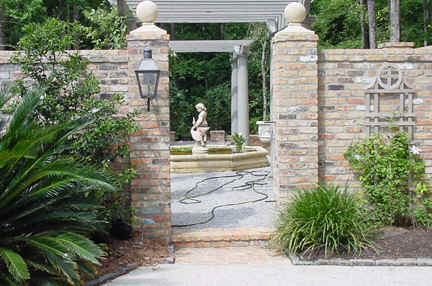
I have a commission to build a Garden Gate for a client in the next town over. They have a very lovely "English Tea Garden" which is bordered by a brick wall. The gate opening is 4' wide and roughly 7' high.
Our first discussions considered the opening was going to be an ached passage into the garden. That 
eventually changed to be lovely brick columns a little wider than the wall with ball finials on top.

Before the wall was built, I made a post with hinge brackets (including matched drilled holes) to be built into the brick column. This would have been the right way to proceed to make this an easy and efficient operation. Unfortunately and for some unknown reason the brick mason took it upon himself to cut the arms off of the pre-made post and have the arms welded back on in some strange manner with new holes that of course do not align with each other or anything else in the known universe. His un-authorized modification has rendered the whole pre-made post useless. We can refer to this as issue #1 . I have devised an alternative hinge system that will be even better and much prettier. ( click here )

Many discussions and meetings with the client have resulted in a design that they like which was based on 
a panel from one of those old European books with many drawings of designs. I made some modifications to the drawing to give it a lighter look and make it work for our purpose. I am NOT claiming that I designed the gate, only that I made major modifications to an already existing design.

May 14, 2002.

The scale of the drawing that we are going to use equals 4 ft. wide and 9+ ft. tall. That's too tall.
We can call this issue #2 Using Photoshop, I scaled the agreed upon drawing to fit the 4' wide x 7' high
space. Basically that means to shorten the design by 2' while not changing the width. It does tend to make
visible changes in the design. It sort of "ovals" it out. This is not a bad thing, it just looks different from what the client liked in the beginning. The other way is to scale down the original while maintaining the aspects of height and width. This will give you a 7' tall gate which is only about 3' wide, but still looks like the original. Now if you put this design into a frame that fits the opening, and do a little fill in on each side, you have a pretty nice piece. (in my opinion)  This is the point that I have reached as of today  I will work on the frame and new hinge system as that won't change in either case. I have sent pictures to the client and will await their decision.   ( click here )

This is where the gate will go We are looking into the garden space.
The gate will have the hinges on the right side and will open into the garden.


The NEXT Step:
The next step was to lay out a full scale drawing of the gate. I drew the frame size on my layout table
and marked it off in a 6 inch grid. Then I printed out the drawing and using a scale, made a 6 inch grid right on the printout. Next I used a projector to blow up sections of the drawing until they met a full size 6 inch grid on a large piece of paper and I traced the projection onto the paper. I repeated this process until I had a full size drawing of the gate. Next I cut out and placed the elements that make up the design. I traced the cut-outs onto the work table. Now I have a full size working drawing of the gate. 

The NEXT Step:
Next I needed to make pieces to work with. I used the paper cut-outs to trace designs onto a new piece of 14 gauge sheet steel. I cut the pieces out with a plasma cutter, cleaned off the slag and dressed all of the edges. Sorry I didn't get any pictures of this part.

The NEXT Step:
These flat leaves made of new steel have no life and look rather bad. Using a verity of hammers, chisels,
punches, swages, fullers, and a swage block along with the power of the treadle hammer and the air hammer I began to work the details into the leaves using a lead block as a soft bottom die. Defining vein lines was the first job. Draw the lines in with a soap stone and a marker. Use chisels and fullers to create the lines.

The NEXT Step:
The vein lines help a lot to bring the flat pieces of steel into the imaginary world of organic living shapes.
This steel is still a long way from looking alive. It is new and shiny and unbearably smooth. It needs texture. I decide to soak the pieces in the gas forge to create scale and eliminate the smooth surface.
Most of the pieces won't fit in the door of the forge so I heated them with a torch and bent them over on themselves. Not a sharp bend and not to have the piece touch itself. It is going to be very hot in the forge for a long time and I don't want the pieces to weld themselves together. I put only one piece at a time into the forge so that they won't weld. I soaked each piece for about 15 minutes. Pull the piece out of the forge and straighten it on the anvil then put it aside to cool and put another piece in the forge.                                      leaf work