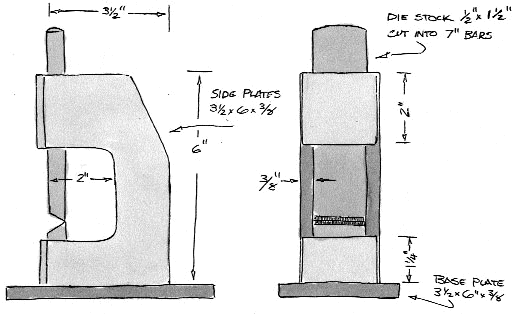
|
 Most of these
dimensions can be adjusted to suit your particular needs, although
I’d caution you about making the tool much bigger. Most folks
who make these overbuild the tool. That’s not such a bad thing
when making the frame, but if the dies are too big they’ll
resist your hammer blows due to the mass of the die. If you’re
working one inch thick stock with a sledge, by all means, scale it
up a bit, but for most work it should be built the size shown or
smaller.. Most of these
dimensions can be adjusted to suit your particular needs, although
I’d caution you about making the tool much bigger. Most folks
who make these overbuild the tool. That’s not such a bad thing
when making the frame, but if the dies are too big they’ll
resist your hammer blows due to the mass of the die. If you’re
working one inch thick stock with a sledge, by all means, scale it
up a bit, but for most work it should be built the size shown or
smaller..
The most
important thing to remember is to start with the die and build the
tool around it. Tool steel is not necessary for these dies, since
most of the work will be done hot. They’re certainly not
necessary for fullering dies at any rate. Use tool steel for the
cutting dies if you must. You could even arc weld spring steel
faces onto mild steel bar stock and be nice to your hammers.
I’ve
used hot rolled bar stock for the dies before, but cold rolled
would be better. The hot rolled dies tended to slop around in the
finished holder, perhaps by as much as a sixteenth of an inch,
which was more slop than I’d prefer. They were built tightly,
too… I had to really wail on it to drive out the bar as I was
building it. The tools I used were a torch to cut out the C-shaped
frame (a plasma cutter would be better) and a cheap Harbor Freight
drill press vise to clamp it together during assembly. Don’t use
a good one, you’ll get weld splatter all over it. You could
modify this design with shims, bolt-on adjustable guides, etc, but
I wanted something that I could build quickly and get on with my
work.
Now you
need to drive the die out of the tool. The newspaper helps a
little bit, but you’ll have to take a short piece of 3/8"
thick bar and hammer the die out over a vise opened a bit over
1/2". If it’s really tight and you can’t get it out, try
heating the tool. This will expand the metal just a touch, plus
it’ll burn out some of the newspaper and should give you enough
slack to remove the die.
Once the
die is out of the tool, clean off any bits of newspaper and test
the die for fit in the tool. You’ll probably need to sand, file,
or possibly grind off any burrs or spots that bind. When I made
dies out of hot rolled, I had a lot of mill scale that was causing
binding and had to grind the dies. After I was done, the fit
wasn’t quite as good as I’d prefer… that’s why I suggest
using cold rolled for the dies, and probably the front and back
die support plates as well. (I used cold-rolled for this example,
and the fit was much better.)
Once the
base plate is welded on, all that remains is a mounting piece on
the bottom, either an appropriately sized piece of square stock to
fit your hardy hole, or a piece of bar stock for use in the vise.
I went with the hardy stem… most of our vises are too high for
this tool. You could use a piece of bar steel that fits diagonally
across the hardy hole to work both as an anvil tool or a vise
mounting, but I’ve never tried this.
When you
fit the die, you’re looking for a snug, sliding fit, but you
don’t want the die to stick. If they do, the tool will be
difficult to use, although a slight sticking would probably be OK.
The dies should break in as the tool is used and slide a little
easier.
Once you
get the dies fitted the way you like, wire brush what you’ve
done so far. (Sandblasting would be better.) Drill a hole through
the base where the bottom die will be… this way if a die gets
stuck you’ll have a way to push it out. Weld the tool onto the
base plate. Again, it helps to clamp the tool down to keep it from
shifting. Tack weld all four corners first, then chain weld the
side plates onto the base plate, and the front plates. I put the
die bar into place before welding, just to be sure the holder
stays in alignment.
| Dies
for the Guillotine Tool
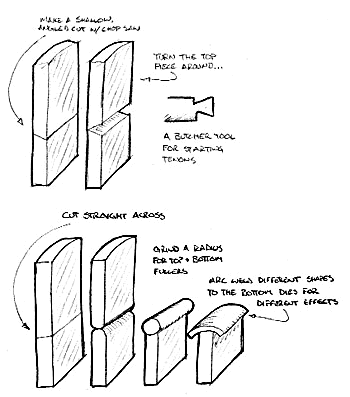
There
is practically no limit to the number of dies you can make
for the guillotine tool. It’s basically a matter of
modifying the end of a piece of bar stock to suit your
purpose.
You
are limited in design of the top die to the width and
thickness of the die, in this case 1/2" by
1-1/2". Since the bottom die is stationary, you can
weld on any size of rod, plate, holders, etc. For single
pattern stamping of, say, a small diamond or heart shape,
it may be better to build a holder for smaller dies, about
1/2"x1".
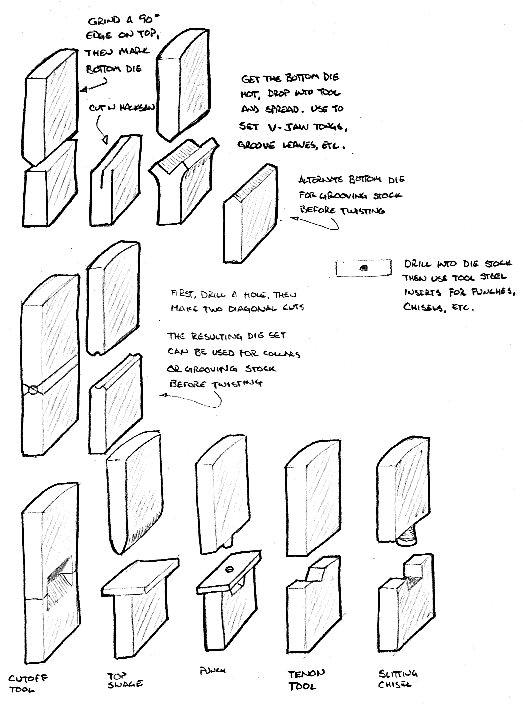
Since
these dies are only used on hot metal, mild steel will
suffice, even for cutting tools and butchers. I’ve used
one for years with minimal wear, but that’s only
occasional use. I bought some case hardening compound to
try on these, but it’s too soon to tell if it makes a
significant difference. If you plan on using these tools
daily, it might pay to make dies out of your favorite
flavor of tool steel. I’ve even arc welded tool steel
faces onto mild steel dies with good results.
Fullering
dies are a natural for these types of tools, since the
edges are always aligned and parallel.
Butcher
tools work well and are easily made from one shallow
angled cut with a chop saw.
|
 |
| I
haven’t tried cutoff tools yet, but I hear they work as
well, especially straight edged hot cuts. These would be
best made from tool steel, and you’ll need a guillotine
tool with a minimal amount of slop in the dies.
Grooving
dies have a lot of potential with a guillotine tool. They
are designed to work along the length of a bar. They’re
neat because they can work two sides of the bar at once.
Other
uses for this tool are decorative pattern stamping, tennon
forming, swaging, etc. Though I’ve never tried it, a
guillotine tool should work under a treadle hammer or
hydraulic press. If you use a press, though, you may need
to make some arrangement to keep the dies from
overheating.
|
|
|